Brave Browser Tips and Tricks
The popularity of the Brave browser has grown tremendously due to its emphasis on privacy and giving users more control over their activity. You’re no longer the product, as is the case with conventional browsers using trackers to sell information to marketers and profiting from your personal data. What’s more, by blocking trackers and using less memory during operation, it provides a faster browsing experience for users, be it on desktop or smartphones. Once you install it, here are ways how you can set it up to get the most out of the browser.
Getting things ready
As you shift your activities to the Brave browser, two things will be important to ensure that you have smooth operations going forward:
-
Setting Brave as your default browser
That way, whenever you’re opening links, going through your social sites, accessing your mail and other activities, you will remain protected by Brave’s security shields. To have it as your default browser, you will get this option under the settings menu. The easiest way is to simply launch the browser and click on the button prompting you to make it the default browser.

-
Importing your settings
Like moving into a new home and bringing your furniture with you, you’ll want to bring over your bookmarks, saved passwords, browsing history and cookies from your previous browser. The import window will enable you to select the specific browser data that you will want to bring to Brave.
You can import them right from the Welcome Tour after installing the browser. In case you skipped this bit, launch the browser and click on the horizontal lines that are at the upper right corner, select settings, and in the window that pops up, click on “Import bookmarks and settings”.
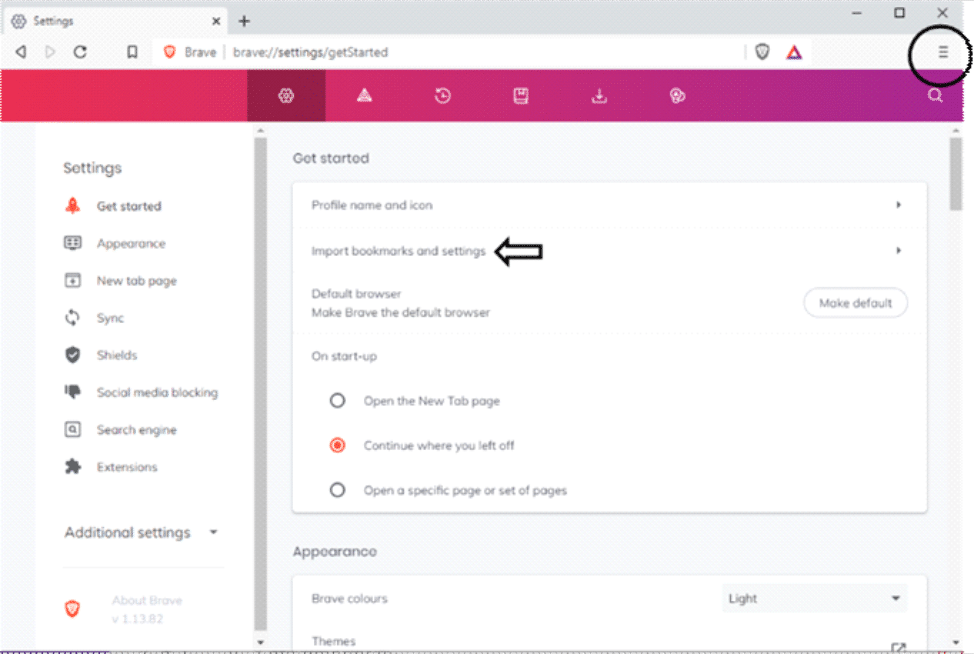
Select the browser that you want to get the data from, then click on “Import”
Personalising the browser
Next is tweaking the browser to suit your individual preferences. This is where aspects like selecting the colour schemes and extension tools for your browsing experience come in. Here are a couple:
-
Enable Dark Mode
- Go to settings
- Click on the Appearance tab
- On the Brave Colours options, change from Light to Dark.
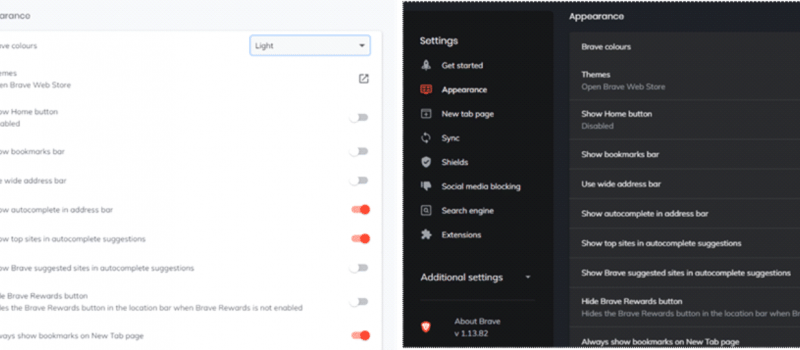

If you already have dark mode for your OS, you can simply inherit this by clicking on “Same as Windows” option thus giving it the same appearance with the rest of the system, so that whenever you change the OS settings the browser will automatically adapt to it.
-
Choosing a customised theme
You can get more customisable themes from Chrome Webstore.
Here, you can use any of the themes just as you would on Chrome. Select the preferred theme, then click on “Add to Brave”. For instance, let’s pick on Oceanic theme:
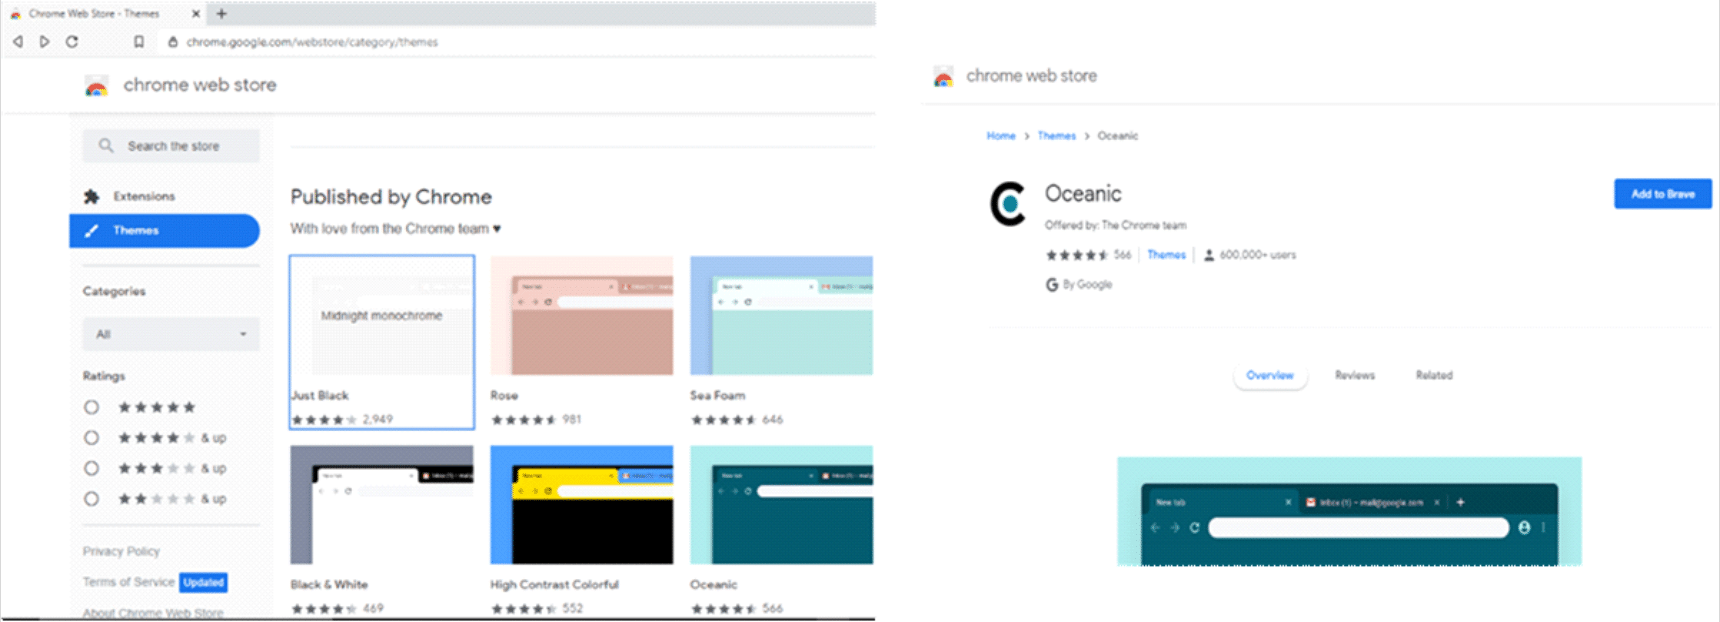
This will be quick and straightforward, and it gives you the opportunity to pick from a wide assortment of themes to suit your particular taste.
Increase your privacy when browsing
-
Use DuckDuckGo as the default search engine
To take your privacy a notch higher, you can choose to set the default search engine to DuckDuckGo. This is because alternatives like Google will keep a record of the queries that you type into the search bar. Brave itself shields you from intrusions like the cookies, ads, and pop-ups, but when you’re using Google and similar search engines your privacy may be compromised. Making the switch to DuckDuckGo will ensure that your searches aren’t tracked. This is also accessed from the Settings window as shown below.
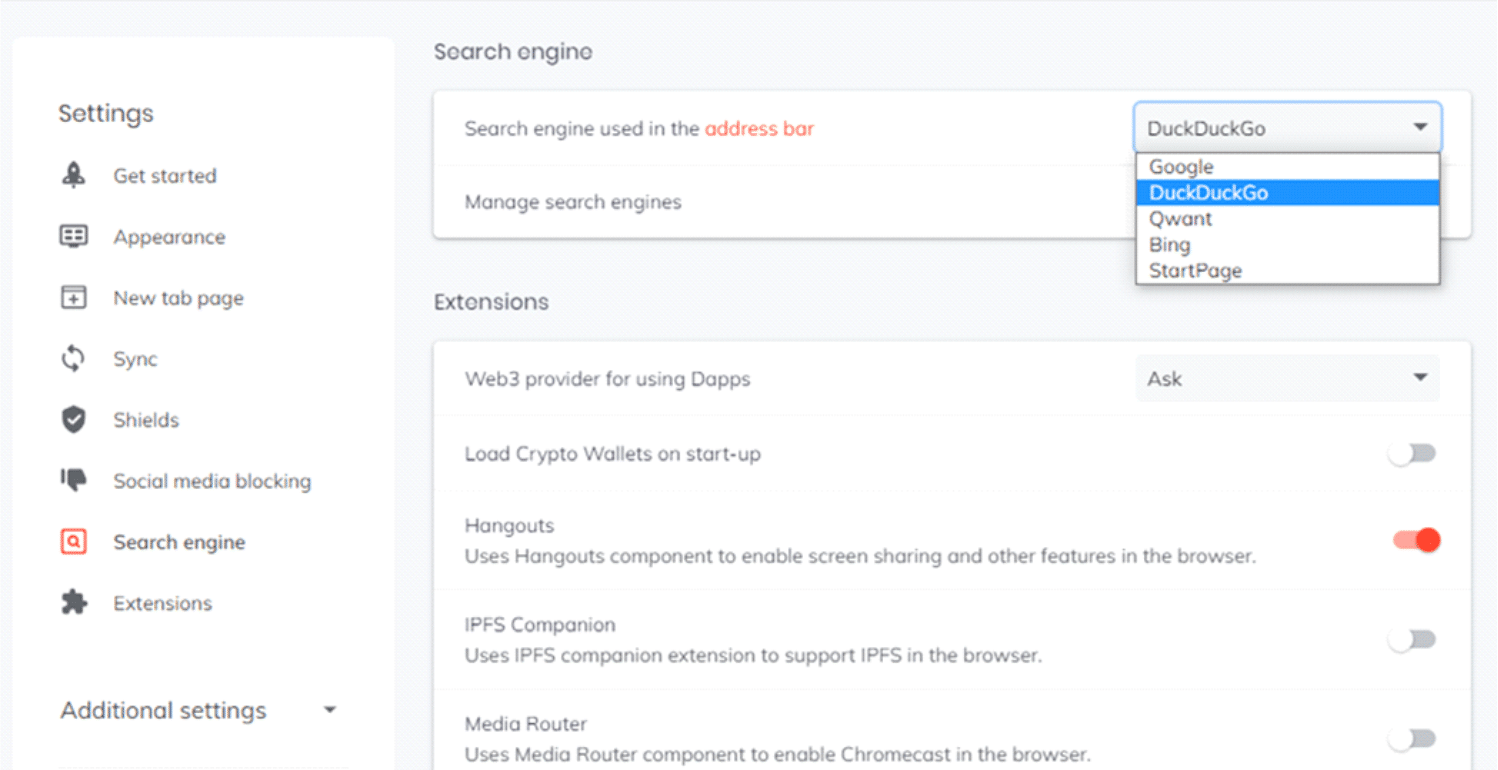
Select DuckDuckGo, and you’re good to go.
-
Use Brave with Tor
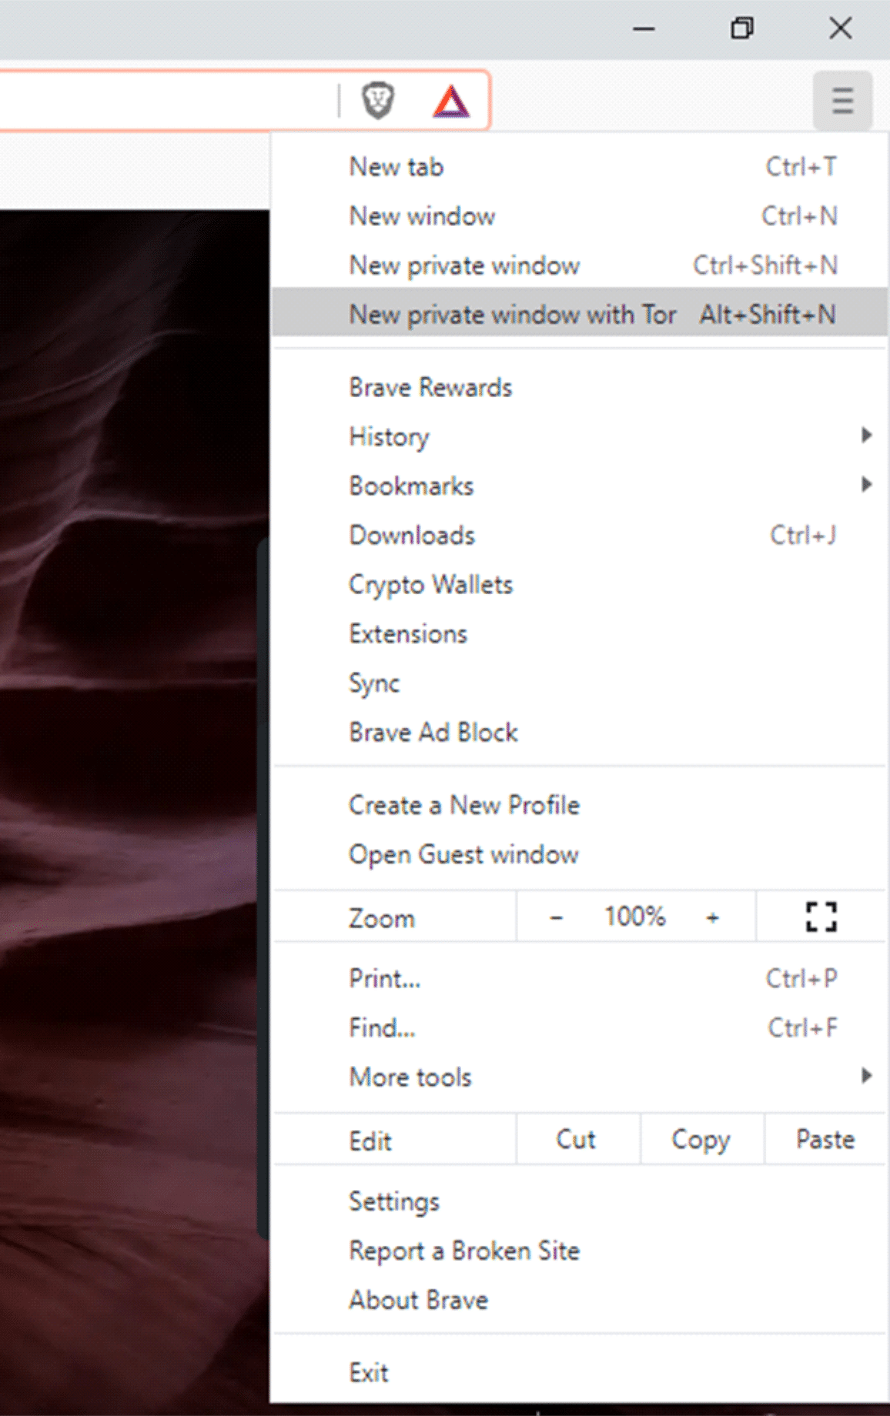
Using Brave’s private window, DuckDuckGo and (The Onion Router) together will make it extremely difficult for your online activities to be tracked. The websites being visited will also find it hard to identify or track the IP addresses that access it when browsing with this mode. You can use the browser with Tor by selecting the option from the drop-down menu after clicking the three horizontal lines on the top right corner.
Make money with Brave Ads
The browser also allows you to monetise the amount of time you spend online. That way, over the course of your normal browsing activities, you will get to rake in some cheddar. This is through the Brave rewards, which can be accessed by clicking that triangle that’s on the upper right section of the browser.
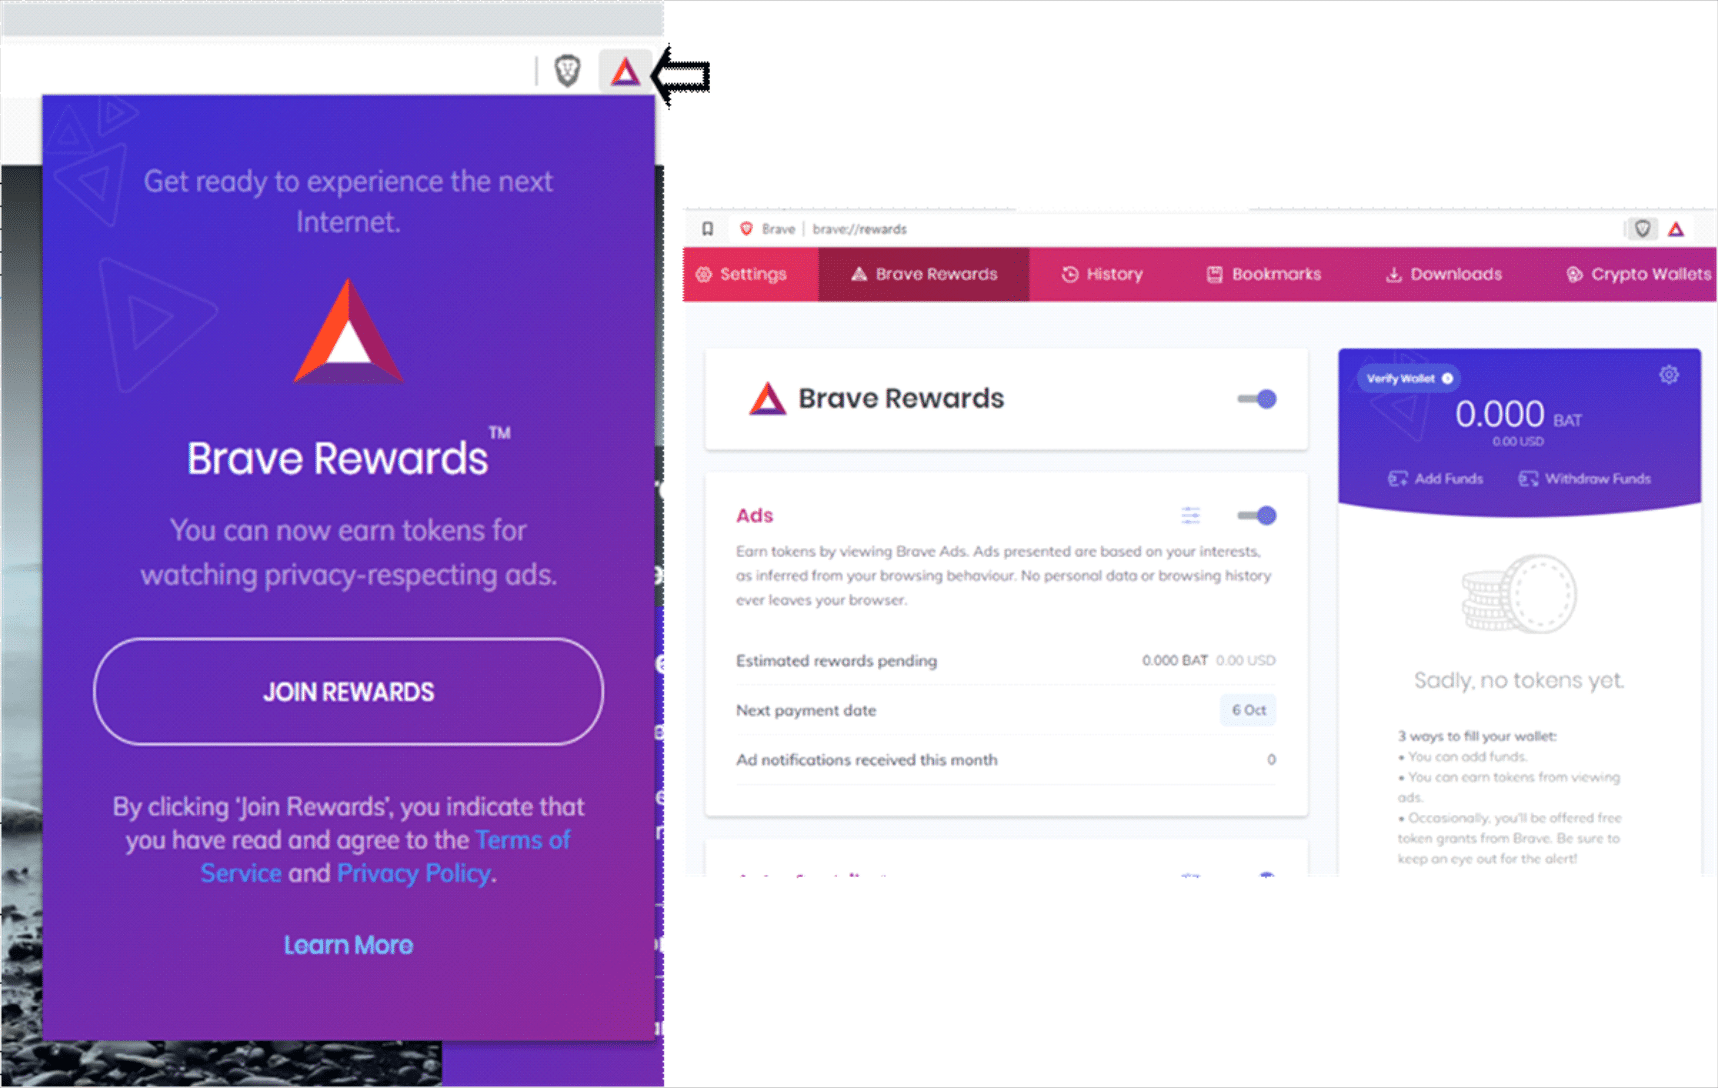
From the ads section, you can set the frequency of the number of ads that you want. You get to choose between 1 – 5 ads per hour. Ads will pop up in a non-intrusive way as you carry on with your normal browsing. When you view the ad and click on it, it will direct you to the target site, and you earn BAT (Basic AttentionTokens) in the process.
Are you a publisher or content creator? Joining the Brave Rewards Creators program will enable you to earn BAT tokens through tips from visitors coming to your website or channel and viewing your content. You also earn when you refer new users to Brave.
Reward your favourite sites
On the other end of the spectrum, you can support content creators using BAT. This is basically like tipping the content creators for a job well done.
This is through the auto-contribute feature, that enables the sites to receive your contributions based on how much you use the sites. Brave also gives you the flexibility to set how the payments will be made. Click on the section indicated below to access the settings.
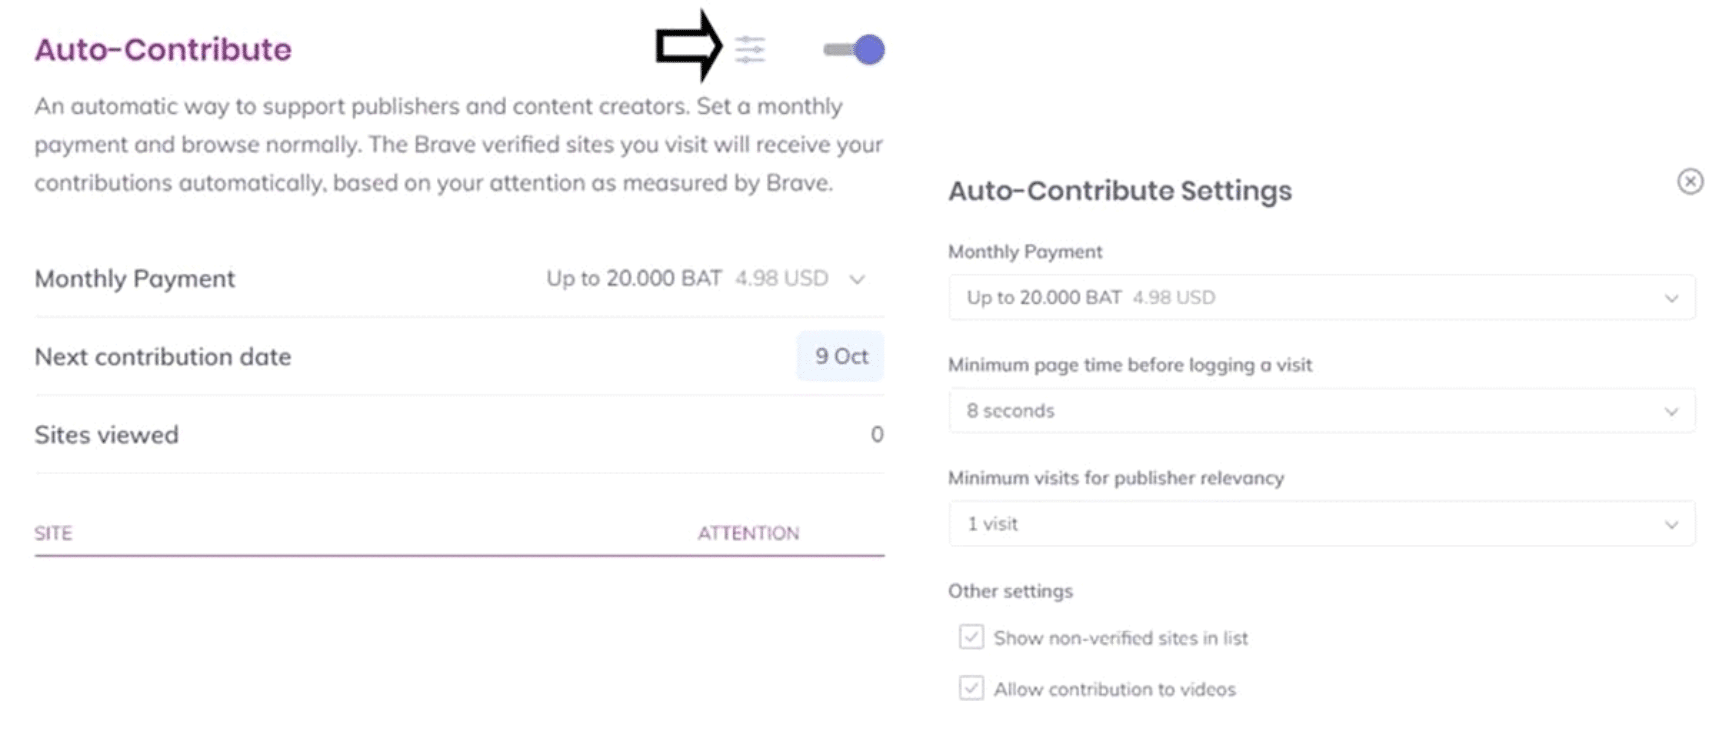
The wallet that the browser creates for the BAT tokens can also be linked to Bitcoin and other digital assets. You can also purchase the BAT tokens from cryptocurrency exchanges, or get BAT from special promotions that are done by Brave.
Sync desktop browser and mobile app
This enables you to sync your browser across your different devices. Access the sync option from the dropdown menu, and click on “Start a new Sync Chain” and select phone/tablet. It will provide you with a QR code that can be scanned.
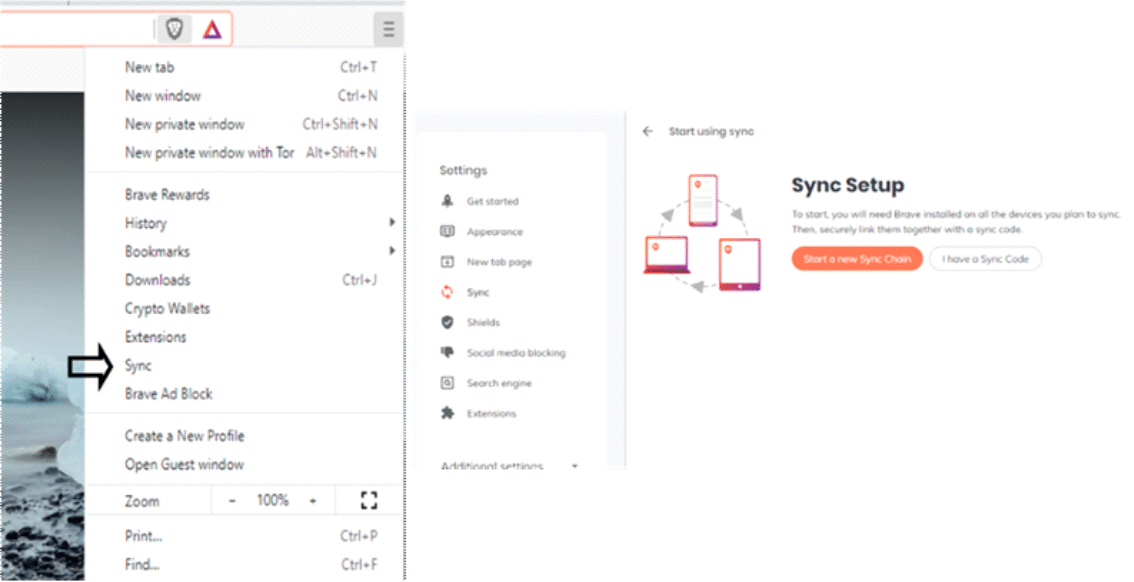
From your other device, access the sync settings on the Brave app, select “I have a Sync Code” and scan the QR on your desktop browser.
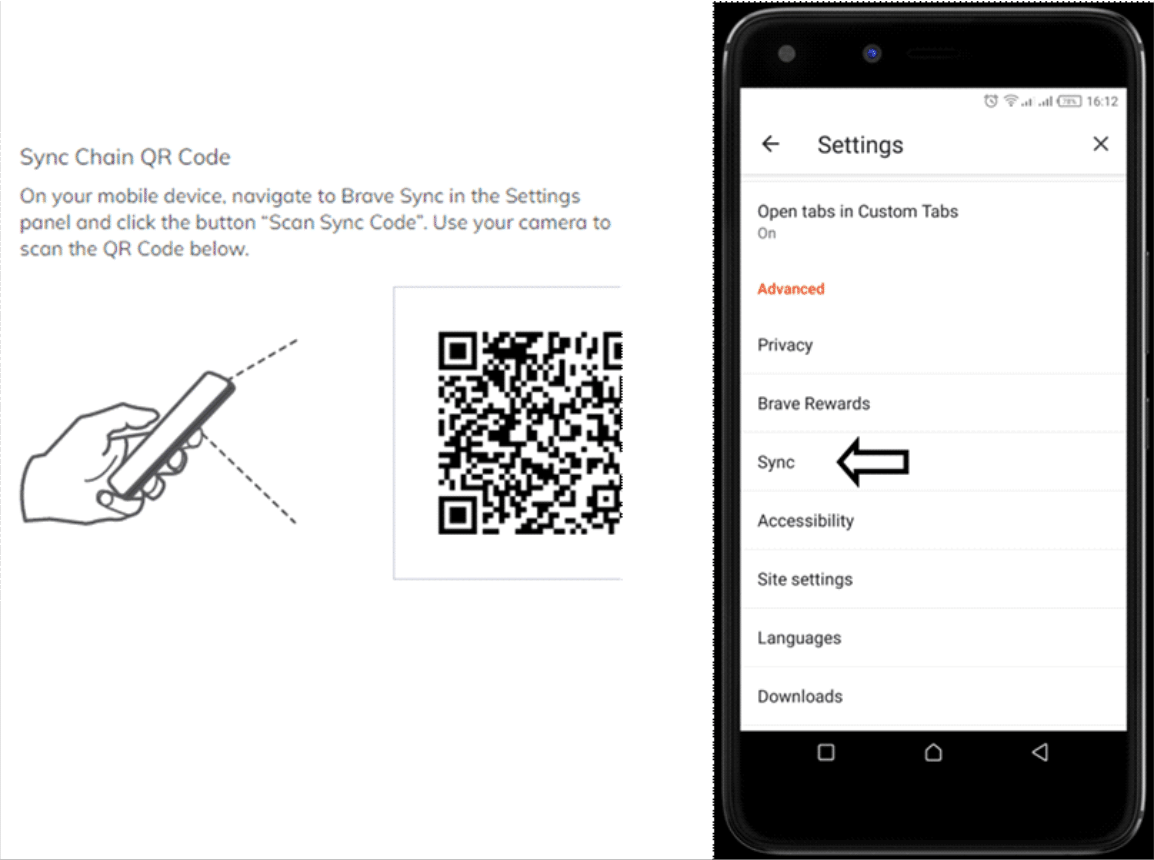
If you’re syncing to another desktop PC or laptop, select “Start a new Sync Chain” and pick computer. You will be provided with 24 unique words. On the target computer, select “I have a Sync Code” and enter these words.
Note that the words are sensitive, and should be treated like a password. If anyone accesses them, they can compromise your synced data.
Block social media
Some sites have single-sign on for Google and Facebook. Brave has a feature that disables this, and also blocks the embedded posts from LinkedIn, Twitter etc. This is accessed from the Settings, and you get to toggle the options as you see fit.
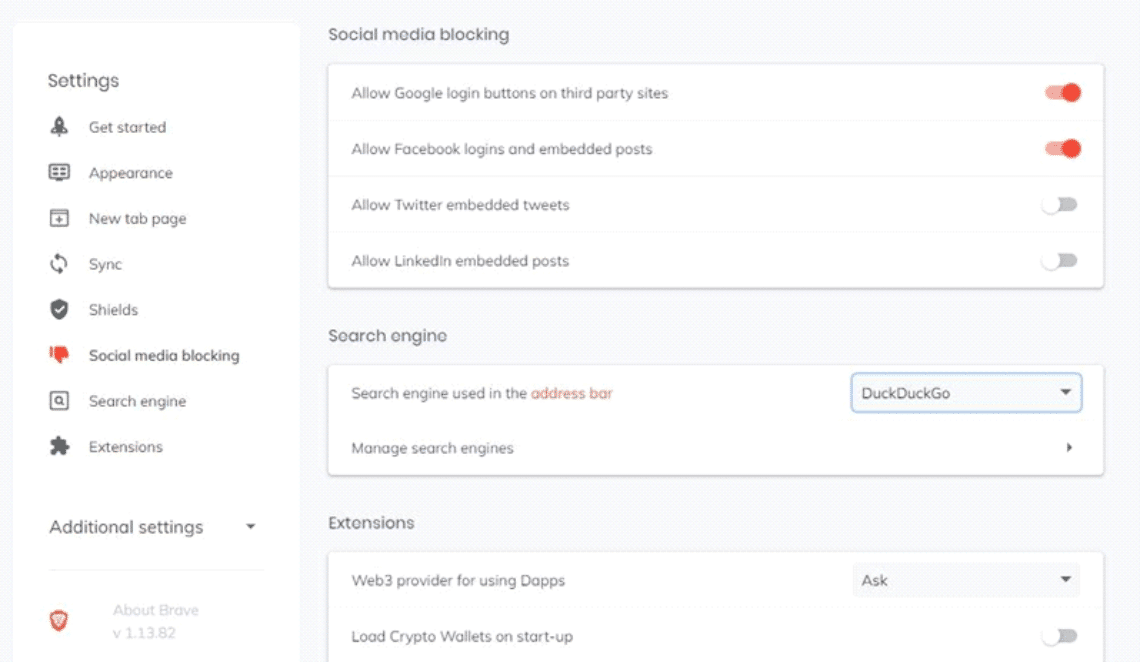
In addition to enhancing your privacy, it also helps you in saving on the costs that you spend on data, since you will not be downloading the extra content. Less power is also spent, saving your device’s battery life. Let’s get more into this with the next Brave browser tip.
Save more power
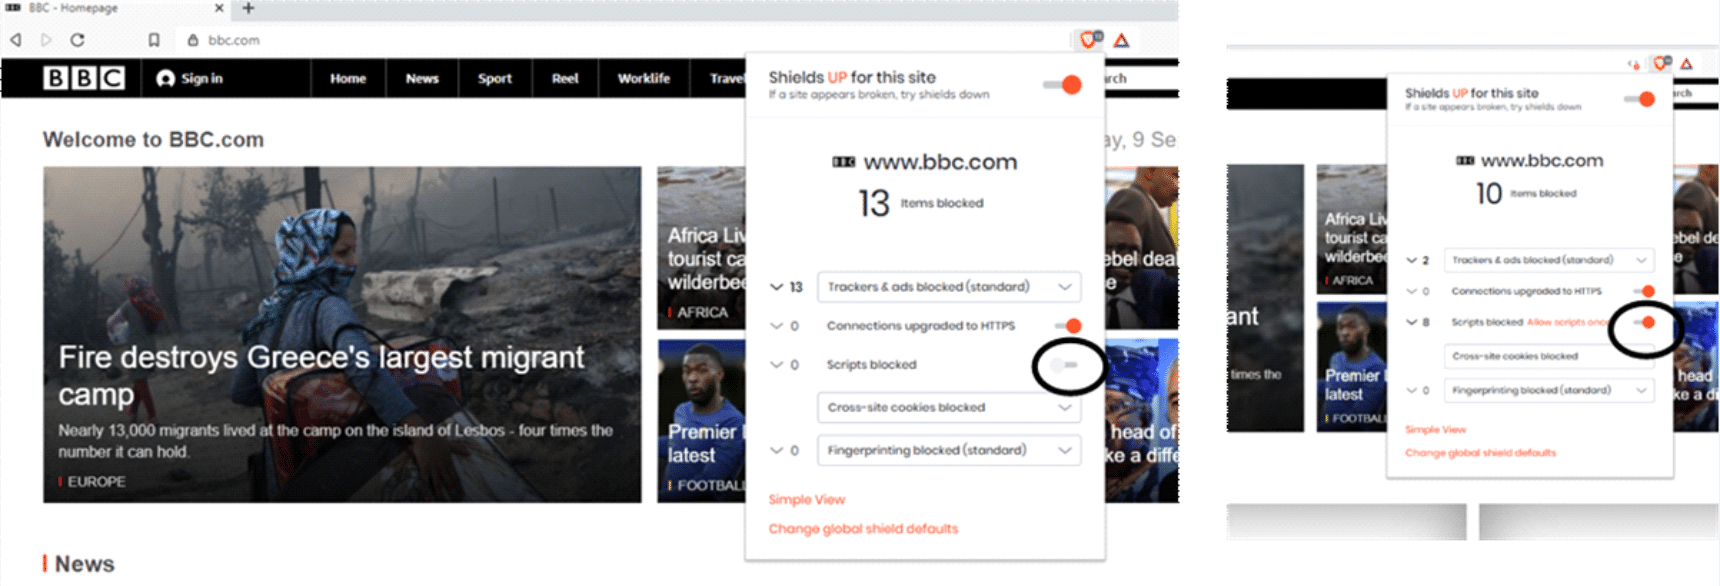
Disabling scripts on the sites you visit also comes in handy in reducing your device’s energy consumption.
For instance, when browsing through BBC news site, you may simply want to read news articles and not waste data bundles or power on the numerous videos and similar content that will be loaded as a result of scripts. To block them, click on the Brave Shields icon and toggle on the Scripts Blocked option.
